Salesforce Integration
Setup
ClearlyRated integrates with Salesforce (and Bullhorn for Salesforce) Talent Rover)!
Talent Rover was purchased by Bullhorn but is built on the Salesforce framework. If you use Talent Rover, it is expected to integrate with ClearlyRated using the following steps too.
Why Activate the Salesforce Integration?
With ClearlyRated’s Salesforce integration, feedback from your ClearlyRated survey program is accessible in the detail view of your leads and contacts within Salesforce. This feature allows for all client information, including their satisfaction scores and feedback, to be easily accessible in one place without having another login to another piece of software.
- Easy to access directly in Salesforce
- Account Manager access to real-time information that improves client relationships
- Historical satisfaction scores and feedback seamlessly visible within a contact’s Salesforce record
Salesforce Integration Setup Process
ClearlyRated survey responses can be displayed within the Salesforce interface on both Lead and Contact pages. This allows you to see survey responses associated with each Salesforce contact without leaving Salesforce. You have the choice of adding it to Leads, Contacts, or both.
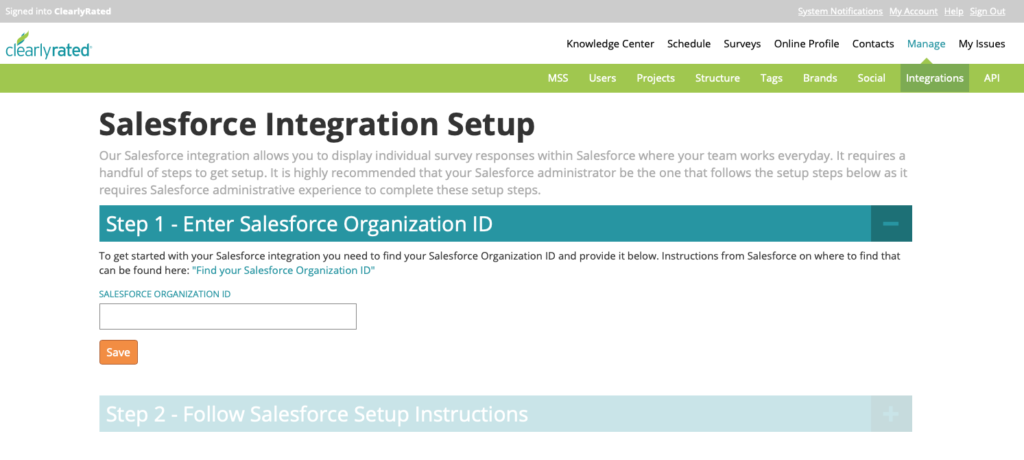
Before you begin: To get started you'll first need to make sure you have entered your Salesforce Organization ID within the ClearlyRated dashboard. This can be done by logging into the ClearlyRated dashboard, going to Manage > Integrations, and then following the directions below to setup the Salesforce integration.

Getting Started: To set up your ClearlyRated Integration in Salesforce will need a Salesforce administrator to go through the following setup steps within your Salesforce account. The steps should be done twice if you want to include it on both the Lead and Contact objects, but only once if you are only adding it to one of them.
1. Go to Setup > Custom Code > Visualforce Pages
2. Click ‘New’ to create a new Visualforce page
3. Create a Visualforce page with the following settings:
- Label and Name (set them the same):
- If you are displaying on the Lead object use: ClearlyRatedLead
- If you are displaying on the Contact object use: ClearlyRatedContact
- Available for Lightning Experience, Lightning Communities, and the mobile app: Checked
- Visualforce markup:
- If you are displaying on the Lead use this markup:
<apex:page standardController="Lead">

    <apex:pageBlock>

        <apex:iframe src="https://dashboard.clearlyrated.com/integrations/sf-response-view-entry?sessionId={!$Api.Session_ID}&email={!Lead.email}" scrolling="true" height="800px" id="CRLeadiFrame"/>

    </apex:pageBlock>

</apex:page>
- If you are displaying on the Contact object use this markup:
<apex:page standardController="Contact">

    <apex:pageBlock>

        <apex:iframe src="https://dashboard.clearlyrated.com/integrations/sf-response-view-entry?sessionId={!$Api.Session_ID}&email={!Contact.email}" scrolling="true" height="800px" id="CRContactiFrame"/>

    </apex:pageBlock>

</apex:page> - Note: in the rare case your firm has multiple ClearlyRated accounts that use a single Salesforce instance you will need to provide the ClearlyRated account ID in the above iframe urls if you want both accounts to be visible inside Salesforce. This rarely applies, so the vast majority of firms can skip right past this. If it applies to you then you should include crAccountId parameter in the urls above and set it to the appropriate ClearlyRated account ID. If you don't know your account ID you can request that from your ClearlyRated account manager.
- If you are displaying on the Lead use this markup:
4. Add these VisualForce pages to the page layouts for the Lead and Contact objects. You will need to repeat this step if you plan to add it to both.
- Go to Setup > Object Manager > Lead Object > Page Layouts
- Click on the specific Page layout you want to add the Visualforce page to. Using the Page Layout Assignment feature you can restrict who has access to the ClearlyRated survey response data by only adding it to the Page Layouts that are assigned to the users you want to see it.
- In the page layout editor, select ‘Visualforce pages’:

- Drag a 'New Section' into the page layout where you want it to appear and use the following settings:

- Drag one of the below Visualforce pages into the newly created section.
- If you are displaying on the Lead object use: ClearlyRatedLead
- If you are displaying on the Contact object use: ClearlyRatedContact
- You need to adjust the size of the Visualforce page to make ClearlyRated appear correctly.
- Click on the wrench icon of the Visualforce page you just added:

- Then adjust the settings to match these and click 'OK':

- Click on the wrench icon of the Visualforce page you just added:
- Click the 'Save' button and navigate to a Lead or Contact to see the ClearlyRated integration on the Detail view of the Lead or Contact.

FAQs
- How does my team access the survey data? The survey data is displayed in the detail area on a contact or lead.
- Where is the survey data stored? The survey data is hosted within the ClearlyRated dashboard. The data is not accessible via search or any other reporting tools within Salesforce.
- Who will have access to this information from my team? Permissions are set at the Salesforce level, not at the ClearlyRated level. You can control access through the page layout assignment in Salesforce.
- Do I have access to the integration? If you’re currently using Salesforce and are subscribed to ClearlyRated at the premium package level or higher - the integration is available to you at no extra cost!
